Friday 24 November 2017

Visit : Venice Biennale

We used the last chance to drop by this year's Venice Biennale before they close their doors this week. 

Greeted by Carole Feuerman in Giardina della Marinaressa, the life-sized resin ladies seem ready to jump into the laguna  and swim south.  


The Russian pavillon with a fitting work "Blocked Content" by Recycle Group on virtual identities, hacking and cyberplay. 


 Great Britain sent Phyllida Barlow "folly"  with an installation reminding me of a (rather unstable) Veronese balcony -


Czechoslowakia: Jana Zelibska - Swan Lagoon 


The pavillon of the United States of America represented by Mark Bradford: The State of the Union's support for art is reflected by the neglect outside? It seems  with purpose that we enter the building from the side door and the neo-classical columns stand forgotten. The huge colourful belly hanging from the ceiling in the first room presses on everybody's stomach and nerves. It reminds me of the colossal fat lump found blocking the London sewer system which required weeks for removal. 


The German Pavillon installed by Anne Imhof and her team, which won the prestigious Golden Lion award, drew long lines. One of the rare performances of "Faust" was happening. Full of dark clicheés with doberman guard dogs behind fences around the imposing pavillion, we thought it blunt and humourlessly oppressive. 


The dogs did not mind the sober atmosphere. They greeted inquisitive visitors with wagging tails. 


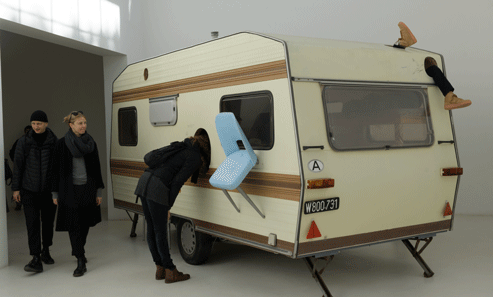
The funniest exhibit was predictably in the Austrian pavillon created with an interactive caravan by the ever reliable Erwin Wurm:


The Arsenale area , formerly part of the military zone next door, is a sight in itself with its huge empty spaces ideal for large installations:


More impressions from the Arsenale area : 

visitors behind nets

 Zilia Sanchez - Amazons

Roberto Cuoghi - Imitazione di Cristo

Alicja Kwade, who also had an installation on Bad Homburg's "Blickachsen" this year


After a long day of walking through Biennale, it is good to have a perfect resting point with excellent food:
the chef of Restaurant "Riviera" close to the Zattere vaporetto watertaxi station prepared something deliciously fitting for Biennale: 
cabillaud on a red cabbage-egg concoction  - presented on a corresponding Murano glass plate ... Hmmmmh :)! 


We will be back in two years' time! 

Monday 20 November 2017

Wanderlust : Venice

(a filtered iphone-version)

There are a few favourite places where I love to go anytime of the year, mostly cities that can be walked and explored on foot, crowded cities, where one can mingle with strangers, watch people and street scenes, fill the eyes with new or revisited impressions and ideas, cities with history and beauty.  Hongkong, Jerusalem, London and Venice fulfill these criteria. 


A one-hour flight down south brought me to Venice this last weekend. The weather was still fine for November, blue skies and the occasional coffee outdoors in a warm shawl basking in the surprisingly strong rays of a pale November sun. Here are some classics that I took wandering through Venice.

Sunrise

the classic medieval view from the Accademia-Bridge ....

 or from the temporary Salute-Bridge


Rialto


tourists


and locals


 early morning deliveries


not quite acqua alta

 San Marco in the evening


Wednesday 15 November 2017

Doppelbelichtungen and other Multiple Exposures


Fourfold exposure of piano keys 

Wet and cold autumn days give little incentive to go out and look for inspiration and new photographs. When I am in such a creative limbo, at odds with bad and rainy weather and no travel in sight, I often resort to a photographic technique that gives instant rewards: Multiple Exposures. By combining two or more pictures in-camera, results can be surprising and immediately challenge the photographer to find more and better combinations. The mood goes up! And what's best: it can be done indoors, in your home with whatever is available. 

I love this technique and have been using it for a long time, even before digital, when double exposures on film required to press the little safety pin for the film spool on the bottom of the camera and turn the lever a few turns to rewind the film about the width of one exposure. Then one would take the second exposure on top of the other. Results were very much haphazard and experiments difficult and expensive. Nowadays, many digital cameras have multiple exposure options in their menu. 
As a side, maybe my preoccupation with "double-layered vision" comes from early childhood experiences: I was cross-eyed when very young and had an eye operation at age 2 but clearly remember the time when I could set my left wobbly eye astray so that I would have double vision which regularly drove my parents crazy :"no one will marry a cross-eyed girl!" .... Although this is not what a young girl should be hearing, it is always good to be able to see things from several angles :). 


It is part of the fun of photography never to know what exactly comes out in the end. There may be professional photographers who envision their images before the shoot, set up a perfect arrangement with lighting and everything else and receive a result which is exactly what they wanted. That may work for certain situations - for me the fun of photography is never to exactly know what the picture will look like in the end, to experiment, to capture an image that surprises me and tells me to continue and search for other versions, for more. 

For this post, I dug a little deeper into my archives and found samples from the last eight years or so, since I started with digital photography. 

Technically, Nikon offers two options for in-camera double exposures: 

"Multiple Exposures" is a quick & easy straightforward method which can be chosen in the shoot menu. It is the equivalent of the old-fashioned method. You can set the camera on up to ten exposures and do them one after the other. The camera will combine them to just one picture - you can even choose to have an automatic exposure compensation, so that the image will not come out overexposed.


The simplest versions: a library shelf, tenfold exposed with the camera moved slightly between exposures. The same technique was employed for a tenfold exposure of  Sansevieria plant leaves. 


These images are simple and straight-forward. The camera is slightly moved between exposures, no change in focus, aperture or focal length.

The following image of the full moon above the Sony-Center in Berlin is slightly more complex: as the moon never rises above the Sony-Center but about 180 degrees off, this is obviously a "fake" picture. Nevertheless it did not require any photoshop work on the computer. On a clear evening in winter, having set the menu on multiple exposure with 2 images and exposure compensation, I took a picture of the full moon in a dark blue evening sky with a telezoom and a large magnification and then turned around and took the picture of the illuminated Sony Center and the high rises of Potsdamer Platz in Berlin with the empty space in the middle. It took a few test pictures because the exposure had to be changed from one picture to the next because of the brightness of the full moon. A few more test pictures to juggle the moon into the right position - much easier and faster than any computer work! 


Another trick that can be achieved with two images overlaid in camera produces a nice "halo" effect: 


This elegant technique goes like this: you make an unsharp image (autofocus off) with an open lens, ideally with the focus manually set to a closer distance to give the subject a larger silhouette,  and add to it a sharp image with a closed lens  for depth. It is very important to control each image for depth ideally using the depth-of-field preview button. If the lens is too closed on the picture with the halo, the image might come out sharp even though you put it manually out of focus. 
I love this for flower pictures - they will get a beautiful halo around the flowers as in the picture of the poppy fields (2nd from top of post and below). This effect can probably be reproduced in photoshop, but to do it "in situ" is much more elegant and rewarding. I usually do it spontaneously without a tripod,  but it sometimes helps to have a light tripod around. It will often result in better or at least more precisely framed pictures, especially if you want to keep the horizon in the frame.


two images combined in camera: out-of-focus f 2.8 and in-focus f 8 with fill-flash.


The second option in many Nikon DSLR is "image overlay" which can be found in the retouche-menu. It is a much more elegant and controllable method. This is a bit more complex and can be done with any two or more pictures, taken in RAW-mode and on the same memory card. One chooses the pictures to be combined, adjusts each for brightness - one can make them come out stronger or let one fade in the background.


One picture with a long exposure and the camera shaken for a "swinging"  background,  the second picture a macro of small forget-me-nots. You can also use a fill-flash on the macro picture for added intensity. 


 Both pictures combined. Little forget-me-nots are difficult subjects, they easily look boring without "special effects". 


 Same here with these Heleniums.


and roses ... 


This picture was an idea that I got from a visit to the musical "Phantom of the Opera". I fell in love with two beautiful songs: "Think of me" and "All I ask of you". I combined both with a picture of a mask, that I had brought from Venice some years ago, with my piano as the backdrop.


These two rather uninteresting pictures together give a better more dramatic end result:


Light-Painting with a torch covered in pink foil in a dark basement room combined with a picture of a bunch of dried roses - how distant friends can boost creativity! 


Viel Spaß!